What are the advantages of
painting with watercolors?
Watercolors are water-based, so they dry very
quickly. This makes painting at a variety of locations more convenient.
They are also easy to clean up, as they are water-soluble.
What are watercolors made of?
Watercolors are made of pigment mixed with the binder
gum arabic. Gum arabic, a non-toxic, natural product, is water soluble,
slightly acidic, and a relatively weak binder.
What is the difference
between professional and student grades?
Student grade paints offer a smaller selection of
colors, and substitute synthetic hues for the more expensive traditional
colors. Colors contain a higher proportion of filler. They are less
expensive because they do not have the same level of purity or
permanence as professional grade watercolors.
Why do painters thin
watercolors?
Because of the weakness of the binder, it is
important to thin out watercolors, as they will crack if applied too
thickly.
What is the difference
between pan and tube watercolors?
Pan watercolors are solid blocks of paint. Add water
using a wet brush, and they are ready to be used. They are perfect for
location painting outdoors.
Tube watercolors are generally more popular in North
America. They have a pasty consistency, and should be diluted with water
on a palette for easy mixing. If tube watercolors have dried on a
palette, they can be used by rewetting the paint with your brush or
spray bottle.
Are pan watercolors for
serious painters?
In North America most painters prefer tube colors,
and pan colors are sometimes incorrectly labeled as a student or
scholastic painting medium. In Europe, pan colors are very popular
because they are so easily transportable, perfect for painting
landscapes in plein air. Just as with tube colors, both student and
professional grades are available in watercolor pans.
Which white should I choose?
Traditionally it is felt that any white in a
watercolor should be the white of the paper showing through. White is
used for tinting other colors, to create lighter shades. However, many
companies offer an opaque white, generally called Titanium White, and
this can be used for various effects.
The best answer is that you may want to use both
whites. Use the Chinese White for mixing and tinting, and the Titanium
White for adding details in white over a colored background or wash.
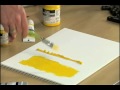
How do I start painting?
With watercolors you should always work from light to
dark. Adding light colors later can be difficult. Watercolor painters
traditionally use "washes" of color. A wash is a thin layer of paint
spread over a large area of the painting. Washes are applied one on top
of the other (allowing one to dry before applying the next), in order to
create depth of color and to add detail.
A wet-on-wet technique can be used where a second or
even a third color is added while first wash is still wet. You can also
use a more direct technique and simply lay the wet paint onto the dry
surface, without building up layers.
Dick Blick offers many
books and media products to help beginning watercolor painters get
started. See our section,
Books and Media, Watercolors.
What surfaces are suitable
for watercolor painting?
The most common is watercolor paper, but other
surfaces such as vellum, parchment, clay mineral panels, sumi rice
paper, or thin fabrics such as silk can be used.
Why use a special watercolor
paper rather than an ordinary paper?
Watercolor paper is specially made to be resilient,
and to absorb water evenly and slowly. Because watercolors are
transparent, the surface takes on enhanced importance. It is thicker and
heavier than ordinary paper and has more texture. The type and amount of
sizing in the paper controls water absorption.
Why use a professional grade
watercolor paper?
Professional grade papers are acid and lignin free,
made of cotton fiber rather than cellulose. They are both stronger and
more enduring. With proper treatment, a painting on professional paper
can last hundreds of years. The paper's texture and surface is brought
out by the transparency of watercolor paints, and is one of the
desirable qualities of a fine watercolor painting.
Why do artists "stretch"
watercolor paper?
Watercolor paper generally has to be stretched before
use. This is especially true with lighter weights of paper, which will
otherwise buckle after absorbing water. After wetting and then
stretching the paper, allow it to completely dry before painting to
prevent it from rippling.
You can paint directly onto paper without stretching
it, but it would be better to try this using a heavy paper that can
absorb a fairly large amount of water without wrinkling.
What brushes should I use for
watercolor painting?
There are many watercolor
brush options available and you can find a wide range of brushes to suit
your individual needs on our
Watercolor Brushes page. Although watercolorists have traditionally
used natural fiber brushes, the best quality natural fibers have become
rare and expensive. A variety of high quality synthetic brushes are now
available.
The highest quality natural fiber brushes for
watercolor are Kolinsky, then pure red sable brushes. The hair on both
is very soft and springy, and can hold a great deal of color while still
able to create very fine points.
How do I care for brushes?
Clean watercolor brushes by rinsing them thoroughly
then wash them with a mild shampoo in warm water. Allow them to dry
laying flat. Always reshape your brush before storing as this prevents
damage to bristles and prolongs usefulness of brush.
You'll find more information about cleaning and
caring for brushes in our brushes section, as well as a variety of
products for cleaning, conditioning, and storing brushes.
Can I fix mistakes on a
painting?
It is possible to remove specific pieces of a
painting or mistakes. Simply blot the wet area with a tissue. If the
paint has dried, re-wet it and blot. Dried paint can be lightened, but
it will probably not be entirely removed, especially if the pigment is a
"staining" pigment.
Acrylic Questions and Answers
What is acrylic paint?
Acrylic paints are a synthetic media made by
suspending pigment in synthetic polymer emulsified by water. They
are essentially plastic paints that are water-soluble and have good
adhesive qualities. They are very stable. They resist oxidization
and chemical decomposition, and will not yellow over time.
What are some main
advantages and disadvantages of acrylics?
Acrylic paints dry quickly. This is both an
advantage and a disadvantage.
The advantage of a fast drying time is that you
can apply many layers of paint in a short amount of time. Artists
can very effectively use glazing and layering techniques when using
acrylics. The layers of paint bind to one another very well because
of their good adhesive qualities.
Another advantage is their water-solubitily, as
this allows for easier clean-up and reduces the need to use
chemicals that may create harmful fumes.
The disadvantage to paints drying quickly is that
there is little time in which an artist can manipulate the paint
once it is laid onto the surface. However, there are several acrylic
mediums that can slow drying time, increase transparency, or help an
artist achieve thick impasto effects with acrylics.
Acrylic paints dry quickly because they are water
based. The time it takes for water to evaporate is how long it takes
for these paints to dry.
What surfaces are
suitable to paint on when using acrylic paints?
Because acrylic paint is very adhesive and
flexible by nature, it can be used on a wide variety of grounds. It
is recommended that an acrylic emulsion "gesso" be used to prepare
whatever surface is to be painted. The best surface is a slightly
textured one, such as masonite or hardboard. Heavy paper and canvas
are also excellent surfaces.
What kind of brushes work
best when using acrylic paints?
Both natural and synthetic bristles can be used
with acrylics, depending on the artist's preference. But, acrylics,
being alkaline in nature, can be hard on natural hair brushes.
The brushes must be kept clean. If acrylic paint
dries in a brush it is very hard to get out without using strong
solvents that might damage the brush. Clean brushes promptly by
washing them with warm water and mild soap when finished painting.
What is the difference
between artist and student grade acrylics?
Fine artists acrylics use high quality, finely
ground and milled pigments, chosen for lightfastness and clarity of
color as well as mixing qualities. They also have more resin solids.
Student acrylics use pre-milled pigment
dispersions, where most colors are mixed or blended rather than used
pure in an acrylic binder. Pigment concentrations are lower, and
fillers are used.
What is the difference
between artist acrylics and craft or exterior acrylics?
Artist acrylics adhere well to canvas, and have a
flexible binder. They are not as well suited to other surfaces, and
they do not survive as well when exposed to outdoor elements.
Exterior grade acrylics concentrate on good
lightfastness and a binder with a slightly harder, more durable
quality to it. They are not as easily damaged by humidity or
extremes of weather.
Craft acrylics use a binder resin related to
fabric paint, but without as much wetting agent, which draws the
color into fabric. They can be heat set into fabrics easily.
At Blick we pride ourselves on providing artist quality paints at the
most competitive price. See why our Blick Artists' Acrylics, Artists' Oils
and Artists' Watercolors are an excellent choice for any fine artist - even
one on a budget!
System 3 is a soft body acrylic that offers the covering power and
lightfastness you would find in an artist quality paint. System 3D is an
ultra thick acrylic that has an oil-like consistency and great peaking
capabilities. See more about these affordable, quality paints in our video.
This video shows the attributes and differences of both the Standard and
Expert Series Amsterdam Acrylic Paints. Whatever level of acrylic painter,
one of these paints is right for you.
Acrylics will never be the same again. Chroma Atelier Interactive
Professional Artists Acrylic paint is both "traditional" and
"revolutionary". Interactive, when used in conjunction with a simple water
sprayer, can be kept wet and workable for as long as needed to complete and
unify a painting � then dries rapidly as desired. It can even be "reopened"
weeks and months later with the use of Unlocking Formula.
Heavy body acrylics were the original paint line created by Golden. This
artist quality acrylic line offers the largest assortment of unique pure
pigments. No fillers or extenders are used. Each color is formulated
according to the pigments unique characteristics for optimal results.
Golden Fluid Acrylics were created for a more aqeous acrylic paint
appication but with the same pigment intensity of the heavy body paints. No
more thinning out your color for fluid painting techniques!
What makes Golden Open Acrylics different from traditional acrylics?
These artist quality Open paints allow for wet-on-wet techniques and a more
relaxed approach to acrylic painting, similar to that of oil painting.
Liquitex acrylic colors come in four distinct viscosities; Soft Body,
Heavy Body, Super Heavy Body and Ink. Each contain high levels of pigment
for intense color and great coverage. Whatever your creative endeavor or
application, there is a Liquitex Acrylic paint that will meet your needs.
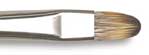
Flat ferrule, short-length hairs, usually set in a
long handle. Width and length of brush head is about
equal. Useful for short, controlled strokes, and with
thick or heavy color.
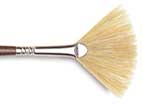
Flat ferrule, spread hairs.
Natural hair is more suitable for soft blending, and
synthetic works well for textural effects. Useful for
smoothing and blending, special effects and textures.
Thick, flat ferrule and oval-shaped medium to long
hairs. Long handles. Natural hair is more suitable for
blending because the hairs hold together when wet.
With its soft rounded edges, the filbert is suitable
for blending and figurative work.
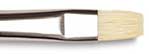
Flat ferrule, square-ended, with medium to long
hairs. Provides lots of color capacity and easy
maneuverability. Use for bold, sweeping strokes, or on
edge for fine lines. Use heavier filling for heavier
paint.
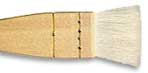
A hake brush is an oriental-style wash brush on a
long flat handle. It is useful for laying in large
areas of water or color, for wetting the surface, and
for absorbing excess media.
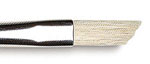
Also known as an outliner. Round ferrule,
square-ended brush, with extra-long hairs and a short
handle. Large color carrying capacity. Useful for
delicate lettering, outlining, and long continuous
strokes.
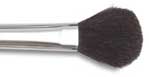
A mop is a round, full version of the wash brush,
made of soft, absorbent natural hair. It is useful for
laying in large areas of water or color, for wetting
the surface, and for absorbing excess media.
Flat ferrule, square-ended medium to long length
hairs. Short handles. Large color carrying capacity.
Useful for painting block letters in a single stroke.
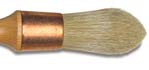
Wash brushes come in varied shapes. The oval wash
has rounded hairs, flat ferrules, and produces a soft
edge, with no point. A wash brush is useful for laying
in large areas of water or color, for wetting the
surface, and for absorbing excess media.
Plastic or natural quill ferrule, with a permanent
or detachable handle. Long hairs, and a natural-shaped
tip. The writer has a round ferrule and a short
handle. Useful for lettering and poster work. Good on
smooth surfaces such as glass.
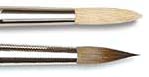
Round ferrule, round or pointed tip. Useful for
detail, wash, fills, and thin to thick lines. A
pointed round is used for fine detail. A detailer is a
pointed round with very short hair.
Pointed, narrow brush with very long hair. Liners
are shorter and narrower. Short handles, round
ferrules. Large color carrying capacity. Useful for
delicate lettering, highlighting, outlining, and long
continuous strokes.
Wash brushes come in varied shapes. The square wash
can produce varying shapes and widths, and often has a
short, "flat-footed" handle for scraping, burnishing,
and separating watercolor paper from blocks. A wash
brush is useful for laying in large areas of water or
color, for wetting the surface, and for absorbing
excess media.
Matting your watercolors
protects and enhances the look of your paintings by cleanly defining the
image edges and isolating your image in a uniform neutral or
complementary background. Mats are made from mat board which should be
made from all cotton acid free fiber.
How to make a mat
101
As a start, choose neutral off white mats either warm or cool depending
of the overall hue and value of your painting. After you've been at it a
while and have seen what others are doing with colors and bevels and layers
feel free to experiment. But fancier mats are best left to your local
framers or purchased precut.
With precut frame and mat sets you will paint your painting to fit a
particular frame and mat size, so test your painting during it's dry stages
by laying the mat on top and work with that shape in mind. A lot of artists
commit to working in only a few standard sizes where the whole process from
easel to installation is simplified. Smart or lazy? Six of one...
Otherwise you cut your own mats and order quantities of your own pre
built frames or buy frame kits at your local art store. This method also
works well for preparing a large quantity of matted pieces for an upcoming
show or (gasp!) art festival.
Basic Mat Cutting
Materials: 2 pieces mat
board, heavy metal straight edge, a sharp pencil, and xacto knife with fresh
#11 blades or a mat/utility knife with new blades. A roll of linen tape.
The tape usually comes in a boxed roll, the actual tape must be peeled from
it's backing before securing. And you'll need a large flat surface you can
cut things on with abandon.
Always be aware of where your fingers
are in relation to the sharp blades you'll be using. (Duh)
You have two layers, a front and a back, or top and bottom, whatever fits
your perceptual orientation in space. Both pieces should be larger than your
painting and cut to the size of the frame you will ultimately use. The top
piece is the decorative mat side with a finish and color that should
compliment the piece you are matting. The bottom is usually a heavy gauge
museum rag board in neutral gray. After determining the actual dimensions of
the image you want to reveal through the mat, subtract the image dimensions
from the mats outside edge dimensions. Split the difference and you have the
dimensions to measure in from each edge to mark your top mat.
Think about it.
Once you mark your top mat lightly with a sharp pencil and lay your art
over top just to see if it's looking right, take an xacto knife and in each
corner of the hole you're going to be cutting press the tip of your #11 in
the very corner and make a slight but thorough cut on each point of the
corner, the motion is sort of like slicing a sandwich. You just want a clean
corner cut that allows you to cut the long cuts easier. You really don't
want to make an over cut while cutting a corner, that can ruin your day.
Rotate your mat and do the other three corners.
Next take a METAL straight edged ruler, the heavier the gauge the better,
and lay it to the left of the left line with the mat lying flat in front of
you. Align the straight edge and press it firmly with spread fingers of your
left hand. (NOTE: You are NOT trying to cut all the way through on the first
cut.) Take your xacto or mat knife (with fresh blades) and starting at the
corner cut, pull a cut with a firm but controllable pressure, letting the
blade align and slide down the ruler as you guide the cut through to the
other corner. Too much pressure on the blade can cause you to slide or
fumble due to imperfect grain in the board. Make direct, confident, and
smooth cuts. It can take 3 or more good cuts to get all the way through. You
can notice the sound of the cut change as your blade exits the other side of
the mat board. Sometimes once I make the initial cut, I move the ruler off
to the side and do the final cuts freehand. It's a good challenge.
After you complete all four cuts gently lift the edge nearest you and
gently push the cut out to make sure you cut it thoroughly. If there's any
stuck bits use your knife to cut them cleanly. You now have a Window.
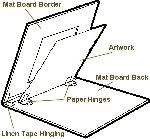
Lay your bottom mat down, lay your top mat on top of it sandwich style.
With the top edge of the mat sandwich to your left, lift the top mat like a
page in a book, up and left and over, and lay it next to the bottom mat.
Align the edges that are butting together. Take a precut length of linen
tape and lay it straight down the middle of the abutting pieces. Press it
smooth. Reinforce the outside hinge corners with strips of 4-6" tape (see
illustration) Fold the page back over to the right, like you forgot what you
read on the previous page.
Lift the top mat and slide your art work into the mat sandwich. Lower the
mat, take a look, lift the mat, move the art a bit, lower the mat, take a
look. Once it's aligned in the window to your liking, gently lift the top
mat back and out of the way. Pressing lightly on your artwork mark the
corners in pencil on the bottom mat board surface. The painting should be
hinged at it's top edge using rice paper hinges (see illustration) instead
of linen tape. If for some reason the painting is torn from the mat board,
the rice paper will tear leaving the painting unharmed. (I have often used
linen tape for this purpose with no obvious problems to date.)
If you are preparing a large batch of matted pieces for sale at a show or
such you would stop at this point and back your pieces with 1/4" foam board
and shrink-wrap them. It is an ideal temporary storage/display strategy for
selling loose artwork. And it looks more like professional product.
Framing your
matted art
You have a matted painting whose exact dimensions match your frame. You
assemble or unpack your frame. With the frame laying face down and stripped
down to the glazing (Plexiglas is recommended) take time to make sure it is
clean and free of all dust and debris. Check your matted piece to make sure
it is clean and slide it face down against the glazing. There is usually a
backing piece of cardboard that nestles on top of the back of the mat. If
not, cut your own to size from a piece of foam board 3/16" to 1/4" thick.
While things are still loose, hold it all together and flip it over to
make sure no debris or stray cat or dog hairs have snuck in between the
glazing and the top mat. Secure the backing board by what ever method your
frame has available. Some have pre-bent tabs, some have tension clips,
wooden frames require brads or if you frame a lot invest in a Framing Tool
that drives framing points (small, flat metal shapes) with the click of the
lever. You may finish the back by using brown tape to seal over the edges
between the mat and frame. It helps keeps dust and moisture out.
Next set your screw eyes. They come in various sizes depending on the
weight of the piece you'll be hanging. On wooden frames I generally measure
1/3 the distance down from the back top edge on each side. If it is soft
wood you can start driving the screw eyes with your fingers until they
catch. They can be further tightened by inserting a small screwdriver in the
eye to use as a handle to twist. If you're using hardwood you must tap or
drill a pilot hole first. I've had many screw eyes snap off during
tightening in hardwood. Metal frames usually come with their own special
loop fittings that slide along an internal track and lock in place. You can
also install "D" rings on a heavier wooden frame which lie flat in a thin
metal bracket allowing the frame to hang closer to the wall.
Measure a length of hanging wire (a braided soft metal wire) about 6"
longer than the gap between the two screw eyes. Loop one end through the eye
about 3" and bend it back and twist the cut end around the wire, securing it
to the eye. Loop the other end and snug it through before you twist and
secure the wire. Over time the wire will stretch a bit so you don't want it
too loose.
When hanging your art take the time to use actual picture hanging hooks.
They are designed so the nail secures strongly at an angle and the hook
allows the picture wire to hang and slide freely without binding. If your
walls tend to chip, lay a piece of tape over the mark before you drive in
the hook. Any dust or chipping from the nail will be secured by the tape.
You could also end up with a 3" crater in your wall...depends on the age and
structural integrity of the walls. It happens.
5 x 7
8 x 10
9 x 12
11 x 14
12 x 16
14 x 18
16 x 20
16 x 20
18 x 24
18 x 24
20 x 24
20 x 27**
22 x 28
22 x 28
24 x 30
3 x 5
5 x 7
6 x 9
8 x 10
9 x 12
11 x 14
11 x 14
12 x 16
12 x 18
14 x 20
16 x 20
15 x 22
15 x 22
18 x 24
18 x 24
2 .75 x 4.5
4.5 x 6.5
5.5 x 8.5
7.5 x 9.5
8.5 x 11.5
10.5 x 13.5
10.5 x 13.5
11.5 x 15.5
11.5 x 15.5
13.5 x 19.5
15.5 x 19.5
14 x 21
14.5 x 20.5
17.5 x 23.5
17.5 x 23.5
1/16 Sht. - 5.5 x 7.5 or 6 x 9
Montval Block - 6 x 9
1/8 Sht. - 7.5 x 11
Std. 9 x 12 Block
1/4 Sht. (or 10 x 14 Block)
1/4 Sht. (or 10 x 14 Block)
12 x 16 Block
12 x 16 Block
Half Sheet or 14 x 20 Block
18 x 24 Block
Half Sheet or 12 x 16 Block
Half Sheet or 12 x 16 Block
18 x 24 Block
18 x 24 Block
*Typical Dimensions listed, may
vary with manufacturer
**Odd Size


 Click to enlarge